Publishing a blog post is a straightforward process, but frequently expanded and enhanced that it can become quite daunting for beginners. This article walks you through the basics for publishing a blog post.
Create a New Post
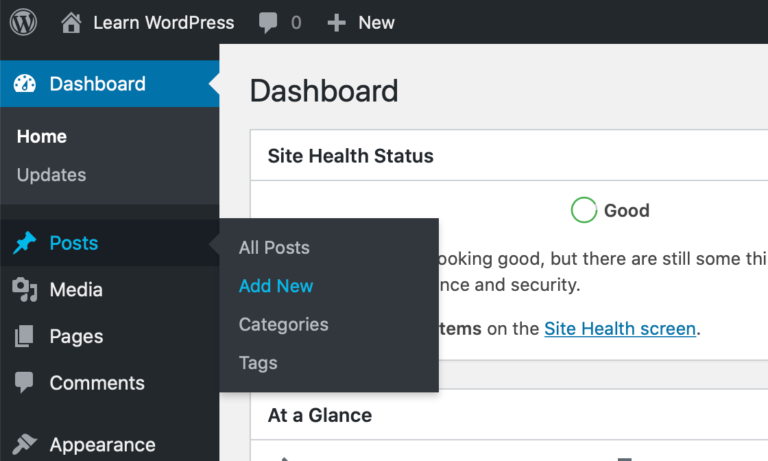
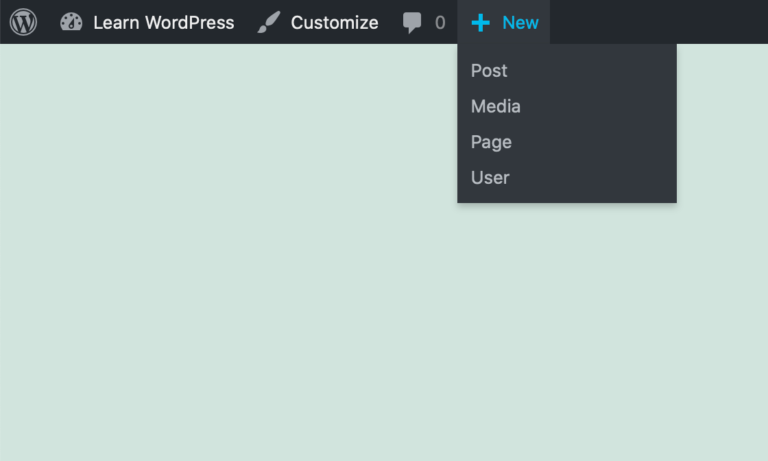
Navigate to the new post screen. You can get here multiple ways.
New new post screen looks something like this. Depending on your theme, the fonts and colors may be different.

Add a Title and the Post Content
Type the post title in the title placeholder. The title will appear at the top of the post.
For the content, click in the main body of the page and start typing, or paste in some text.
All of the content in the post are created in the form of blocks. Blocks are individual units of content that make up your blog post. The default block is the paragraph block, so typing and pressing the Return key creates new paragraphs.
The editor comes with many default blocks like images, headings and quotes. Click the + button to bring up the Block Inserter. Scroll through the list or search for a block. Click on the block to insert it into your content.

Learn more about the block editor in the next article
Once you have added the title and content, your blog post will start to come together.

TIP: The New Post screen defaults to Fullscreen mode. If you prefer, you can exit back to the regular view like this.

Preview your post, or Save for later
Next to the Publish button in the top right, you’ll find buttons to Save and Preview the post.

Saving the post creates a draft. You can close your browser and continue working on the post later. You’ll find drafts in your WordPress dashboard → Posts → All Posts.
Preview gives you options to view your post for large, medium and small screens – Desktop, Tablet and Mobile respectively. These views are only approximations however, so for the most accurate preview, choose the Preview in new tab option.
Recommended Steps
Now you are almost ready to publish your post. Before that, we would like to suggest a few more steps to enhance your post.
Start by revealing the post settings. You’ll want to have the Post or Document tab highlighted in the editor sidebar. If you don’t see the editor sidebar, click the Gear icon (next to the Publish button).

Set Category and Tags
Within the post sidebar, you’ll find settings for Categories and Tags. These help organize your blog posts and help visitors navigate your site. However, be wary of creating too many categories and tags. Too many of them will just add clutter to your website.
How are Categories different from Tags? Categories are more general and function like the sections of a newspaper e.g. National, Business, World and Sport.
Tags are for more specific topics. In general, we recommend using Categories and skipping tags entirely. Contrary to popular belief, they don’t help with SEO and can even harm SEO if used incorrectly.
Learn the correct way to use tags
Assign a Featured Image
We strongly recommend adding featured images for every blog post. These images appear in the index page and other listing pages, making your blog look more attractive. With the correct settings, these images also appear when your blog post is shared on social media.
Learn how to assign featured images to your posts
Excerpts
Excerpts are hand-crafted summaries of your posts. While they are optional, your theme may display them so you can use these Excerpts as teasers for your post content.

Configure SEO settings
SEO is also optional, but spending some time on it can help your content get found in search engines more frequently. Once you’ve mastered the steps above, read our guide on the absolute minimum SEO every website owner should know.
Publish the Post
You have now created your post, filled out the content and configured the settings. All that’s left for you to do is to click the blue Publish button in the top right of the screen.
Clicking Publish will bring up a pre-publish checklist. If you’re happy with everything, click Publish again to confirm and make the post go live.
Congratulations! You’ve successfully published a blog post.