
Images are important to make your content more engaging and interesting. But used wrongly they can make your website a turn off, no matter how attractive those images are.
Images that are too small will look blurry and low quality. Images that are too big will make your website slow. The solution is to properly optimize images for your website.

In this article, we’re going to save your images from looking like the ones above. With doughnuts!
Step 1: Choose the Format
The first step to optimizing images is to choose the best image format.
Just like how doughnuts come in a variety of flavors and styles (glazed, frosted, jelly-filled, etc), images can come in different formats. The ideal image format will communicate your message effectively while ensuring the best user experience for your audience.
The image format you choose will depend on the content of the image.

JPG (or JPEG) images are best for photos i.e. images captured with a camera or mobile phone.

PNG images are best for graphics like logos, icons, etc. PNG images can also have transparent backgrounds which is a very useful feature.

GIF images are the fun ones that can contain animations. GIFs also have limited transparency capability.
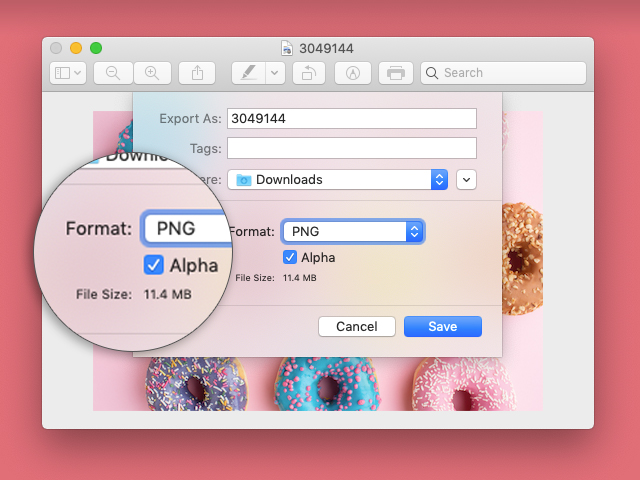
Based on these guidelines, select the most appropriate format when saving or exporting your images. Tip: In some image editors, you need to “Download” the design to choose the format.


Don’t use PNGs for photos
PNGs are the “heaviest” file format
Avoid using screenshots of photos
PNGs are the “heaviest” file format. As mentioned above, they are best for graphics. You can use a PNG for photos, but the file size will be much larger than a JPG. This will cause your site to load slower and can affect your SEO.
We notice that many bloggers like to quickly grab a picture off another website by screenshot-ing it. Unfortunately, most screenshot software saves the image as a PNG which means the resulting file can be much larger than necessary.

Instead of screenshot-ing the image, you can right-click and save the image. Then simply upload it to your site. Don’t forget to credit the website where you got the image from too.
Step 2: Compress

The 2nd step to optimizing images for your website is to compress them.
Image compression works by removing details from an image to reduce its file size. However, over-compressing an image can cause the image to start looking weird and “yucky”. Yep, that’s a technical term.
There are many ways to compress images.
With a WordPress Plugin
Using a WordPress plugin is the most convenient way to compress your images – you simply upload the image to WordPress and it gets optimized automatically. The drawback is that you don’t have control over the level of compression and the fact that some of these compression plugins cost money. The image optimization plugins we recommend are EWWW Image Optimizer and Compress JPEG & PNG by TinyPNG.
Image Editor
Using an image editor allows you to better control image compression settings. Your image editor may automatically compress your images (like Canva) or it may have an option to export images at a lower quality (like Photoshop).
Image Compression Desktop App
These apps make it easy and convenient to compress your image. Install the app and launch it. Drag and drop the images you want to compress into the app. Voila! Your images are automatically compressed. Our recommendations: ImageOptim for Mac and Caesium for Windows.
Online Image Optimization / Compression Tool
These work just like their desktop counterparts, but without needing to install anything on your computer. We really like TinyPNG and TinyJPG because it automatically applies the correct amount of compression without sacrificing the image quality. Alternatives: Kraken.io, Compressor.io
Now you have a slim and trim image in the right format. You’re ready to upload it to your website.
Step 3: Pick A Size
Before we continue, we need to understand image size and file size.
Image size is the width and height of an image (how much space it takes up, or its dimensions) and is measured in pixels (px). In doughnut terms, this is the size of the tasty treat.
Image file size is how much storage the image uses on your computer or website and is measured in kilobytes (KB) or megabytes (MB). This would be how many calories the doughnut has.
Image size is how big an image is, and
File size is how heavy the image is.

Image size can influence file size. If you have a very big image, then the file size will generally be big as well. And if you get one of those Texas-size doughnuts, you’re gonna get a Texas-size serving of calories too.
With that out of the way, keep in mind that this section is talking about Image Size, or how much space the image takes up.
Why is image size important?
If you only have space for an image 300px wide, anything larger is not optimal. You technically can squeeze a larger image into that space, but that will slow down your website. Your website visitors will take longer to download the larger file, and their browsers will need more time to scale the image down. So choosing the appropriate size is a key to optimizing images for our website.
Use an on-screen ruler to measure the space available for your images. Download A Ruler for Windows (Windows) and Free Ruler (Mac)

I want to use the same image for a large full-width banner as well as in my small sidebar? Do I need 2 copies of the same image in different sizes?
Yes… but WordPress to the rescue!
WordPress Image Sizes
WordPress generates multiple sizes of every image that you upload to the media library. This means you upload an image, and WordPress will automatically create the following sizes for you to use:
- Full size for full-width banners and photo galleries
- Large size for blog posts and pages
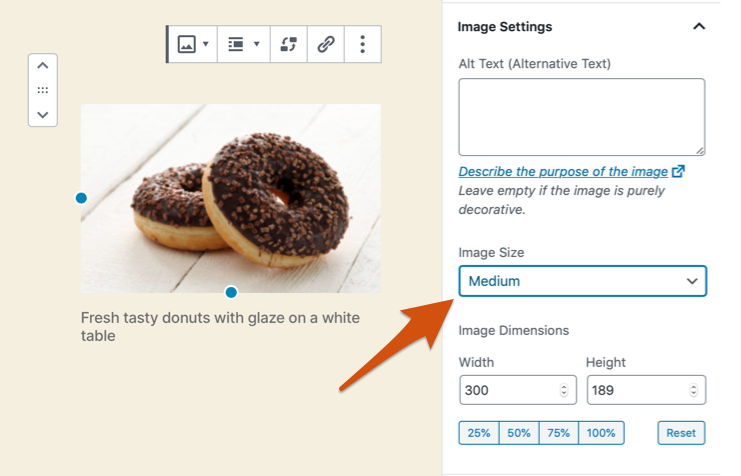
- Medium size for small blog images or images for the sidebar
- Thumbnail size isn’t very useful, but available if you need
- Possibly more, depending on the plugins you have installed
This means you don’t have to manually create multiple image sizes if you want to re-use the same image. All you need to do is pick the right size when adding images into your content.

Full size is technically not full size
WordPress resizes all uploaded images to a maximum width and height of 2560px. This helps avoid your Full size images from being too large and also saves space on your web server.
It also means you can uploads images directly from your camera without worrying they will ever be too large for your website. That being said, uploading full size, 24-megapixel images from your camera will take a loooong time because of the large file size.
Rule of thumb for the best image size: 3000px maximum for the width and height, and no more than 2MB in size.
Resizing vs Cropping Images
There’s one final thing we wanted to talk about. When optimizing images for websites, we mainly want to resize images. However you can also crop images, and it is important to know the difference.
Resizing is altering the size of your image without cutting anything out. Resizing is also known as scaling.
Cropping is cutting off a portion of the image to change its shape.
Imagine that you need a square profile picture. The selfie from your phone is in portrait orientation (tall) and much too large. Here’s how to use that selfie for the profile picture.

Start by cropping the image so that it becomes a square.

Next, we’ll resize the picture so that it fits the space for your profile picture.
Here’s how it looks like if we had taken a shortcut and resized the height and width without cropping. Worse than a squished doughnut!

So that’s the difference between resizing and cropping. And what happens if you try to take a shortcut. Now you know!
Summary to Optimizing Images
Images are an important element of your website, but using them wrongly can result in poor user experience and impacts your website negatively. That’s why it’s important to optimize your images.
The 3 steps to optimize images for your website are:
- Choose the right format
- Compress the image
- Pick the right size
We hope this article has helped you understand how to optimize images so you can ensure that your websites load quickly for your visitors. At the very least, we hope we entertained you with my love for doughnuts!
Further Resources
How to display images side-by-side in WordPress
Share a link to Facebook with a preview image
How to Optimize Images for SEO by Grand Cru Digital
10 Stock Image Websites You Need To Know In 2021 by Oberlo
Canva Tutorial for Newbies – Youtube video by Five Minute Social Media
Photo credits: Nerfee Mirandilla, Court Cook on Unsplash; rawpixel.com, Racool_studio on Freepik; @ubereats on Giphy; @eatinwithb on Instagram


