
Yoast SEO is a comprehensive plugin to help increase your visibility in search rankings and social media. Using this plugin won’t replace your online marketing activities, but it will set the foundation for your online marketing success. It paves the road for potential traffic to your website.
New users are often intimidated with how to use Yoast SEO because it is so chock full of features. On top of that, Yoast SEO tutorials always use technical phrases and acronyms like on-page SEO, SERPs, Open Graph meta and more. This article will guide you through the essential setup and basic use of the plugin using plain English as much as we can.
We’re not aiming to teach you all of Yoast SEO’s features (there is a training course for that). Most website owners aren’t going to make use of all the plugin features anyway. My goal is to show you the settings you must configure and give you a quick overview of it’s most important features. Ready? Let’s go!
Essential Setup for Yoast SEO
The first step, of course, is to install the Yoast SEO plugin. Go to the Plugins → Add New screen and search for Yoast SEO, then install and activate it if you haven’t already.

With the plugin activated, you’ll find a new SEO item in the WordPress dashboard navigation. You’ll also see a prompt to start the tour. Do the tour or dismiss it. Now, to configure the most important settings for the plugin.
We’ve organized the article according to the pages in the plugin settings and highlighted the specific tabs you should configure with checkboxes. Some settings pages are not mentioned because they are more “advanced” than “essential” but you can learn about them with the inline Help Center on almost all of the Yoast SEO settings pages.
General settings
General settings for Yoast SEO and your website.
Your Info
The info you provide in this tab helps identify your website to Google. If you’re a company, Google may use the company name and logo in the Knowledge Panel in the search results.

Webmaster Tools
You probably won’t need to use the Webmaster Tools tab immediately, so bookmark this for later. This is where you can verify ownership of your site for Alexa, Bing, Google and Yandex with the meta tag verification method.
Titles & Metas
These are the settings that control the appearance of your website in search engines and social media. Every page on your site (even the automatically generated ones e.g. error pages) has a page title, and meta descriptions are automatically generated by the search engine. The settings here determine the default page titles and meta descriptions on your site.

The defaults for this section are quite good, so the only settings to configure are on the Homepage tab. Feel free to explore the other tabs if you like.
Homepage
Depending on how your site is setup, you will either see:
Fields for the title template and meta description template. Replace the default text here with what you want to appear in the search results like the example above. Ideally this should describe your site and include the keywords that you want to be found for. You don’t need to use the template tags (the stuff that looks like %%sitename%%).
Or, you may see a message saying you can edit the front page and blog page itself. If this is what you see, skip this setting for now and we’ll address it in the Basic Usage section.
Social
Yes, Yoast SEO helps you optimize for social media too! Before we jump into the settings here, go edit your profile (click on your name in the top right of the screen) and enter your social media account info under the Contact Info section.
Now come back to SEO → Social. The tabs in this section determine how content on your site looks when shared to Facebook, Twitter, Pinterest and Google+.


Keep in mind that these are general social settings that define the defaults. You can customize the link previews for each page or post as well.
Accounts tab
Enter the links to your social profiles. Don’t forget to include the http://
The Frontpage settings tell Facebook how to display your site when someone shares the homepage. (Note: This may be hidden if you your website doesn’t display the blog on the homepage.)
Your image must be 1200×628 pixels to appear like the optimized preview in the example above. Use a custom title and description, or copy it from the search Titles & Metas settings.
You can also upload a a default image for pages and posts that don’t have images under the Default settings section. Again, your image should be 1200×628 pixels.
Finally, if you use Facebook Insights you can define an admin and add the necessary meta tags to your site – not an essential setting, feel free to skip.
We suggest changing the Twitter card type to Summary with large image. However if you aren’t going to use a featured image for each post, the Summary card may be better.
The only setting here is to confirm your website with Pinterest using the meta tag method. Skip this if you have previously confirmed your site with Pinterest.
Pinterest uses the same data as Facebook for its Rich Pins. To enable the Rich Pins functionality, configure the Facebook settings and then apply to have them appear on Pinterest.
Google+
If you have a Google+ page for your business, add that URL here. Now go to edit your Google+ page and add your website as a link on the About tab.
Search Console
If you use Google Search Console (formerly Webmaster Tools), go to SEO → Search Console and click the Get Google Authorization Code button. Once you complete the authorization process, this screen will display data from your Google Search Console.
Yoast SEO Page Optimization Basics
Your website is already more visible after configuring the essential settings above. But you can really make it stand out by spending some time to optimize each piece of content before you publish it. Using Yoast SEO helps in 2 main ways:
First, it puts the words that your target audience uses in the page title and meta description. The person searching is more likely to click on a result that contains the exact words he is searching for.
Second, Yoast SEO can make your pages more attractive in social media news feeds to generate more clicks and traffic to your website.
Let’s take this article as an example. There are already a lot of other Yoast SEO tutorials on the web, so my hook to differentiate it from the rest is to write a plain English guide.
But almost nobody is searching for plain english guide to yoast seo. They’re searching for yoast seo tutorial, how to use yoast seo or something related. So for maximum visibility, I want to make sure I use keywords and phrases like these in my page title and meta description.

At the same time, I don’t want Facebook and Twitter users to say, oh it’s just another how-to on this plugin. Therefore I want to play up the plain English aspect of this article with a tailored headline, description and image for social media.
In other words, I’m using different words for people in searching/learning mode and for social media users in browsing/reading mode. Let’s take a look at how you do this with Yoast SEO.
The Yoast SEO Options Box
The Yoast SEO plugin adds an option box (meta box) to the Add/Edit screens in WordPress – see the screenshot below. Along the side are 3 vertical tabs – a traffic light, advanced and social settings.
The Traffic Light tab
The default content tab (the traffic light) contains a field called Focus Keyword. I recommend filling out this field first. The focus keyword is a writing tool to help you create content optimized for that keyword. For this article, my focus keyword is how to use yoast seo i.e. this is the search phrase I want to rank for. Once I type in the focus keyword (or phrase), Yoast SEO immediately grades my content in the Content Analysis section below. The goal is to get as many green bullets as needed until the traffic light icon shows a green light.
Right now however, Yoast SEO is telling me that my focus keyword doesn’t appear in the page title, meta description and URL. I’ll fix this by clicking the Edit snippet button to define the title and meta description for this page. The length indicator turns green when you meet the optimal length.

After the previous step you should have several green bullets. Read the descriptions for the red and orange bullets and adjust the content of your article. Eventually you’ll get enough so that the traffic light turns green. You can stop here because you shouldn’t over-optimize your content and aim for all green bullets.
The Social tab
The social tab is where we define a different title and description for Facebook and Twitter, if you don’t want it to follow the ones set in the traffic light tab.
For this article, my page title is rather descriptive to fit in the focus keyword. But for Facebook and Twitter, I’m going for something more striking and play up the plain English aspect of this article. I also don’t need to include the focus keyword.
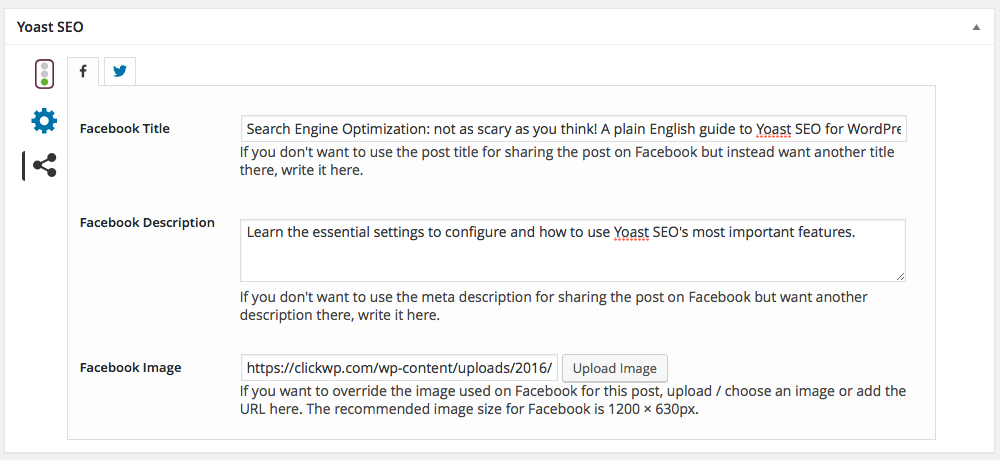
Finally, the link previews in Facebook and Twitter will use the Featured Image. Upload a different image if you prefer.
We’re skipping the Advanced tab becaused it’s “advanced”, not “essential” ?
Phew! We’re finally done with all the essential optimizations. Time to publish the post and celebrate with a cold beverage.
Tip: You don’t have to optimize every page on your site. Prioritize the most important pages, and do as little or as much as you need to meet your marketing goals.
Bonus Tips & Further Reading
I hope that this article helped make Yoast SEO and optimizing your website content more accessible. Here are some resources if you’d like to learn more.
Inline Help Center

There is a Help center on all of the settings pages. Watch the videos and read the explanations to understand the settings further.
SO Hide SEO Bloat plugin
The Yoast SEO plugin makes use of prominent notices and callouts. Those of you who find them annoying can hide them by installing the SO Hide SEO Bloat plugin.
Force Facebook to update link preview
Made a change to your Facebook settings but it’s still showing the old details? Here’s how to fix Facebook link preview.
Further Reading
How The Focus Keyword Works On WordPress SEO By Yoast
If you’re still not sure how the focus keyword field works, Matteo Duo helps clear it up.
How to choose the perfect focus keyword
Advice straight from Yoast
The Beginners Guide to SEO by Moz
This is a bible for anyone who really wants to learn about SEO. If you’re short on time, I recommend reading Chapter 5 on Keyword Research since that is such an important aspect of this field.
Did you find this article helpful? Please share it with your friends!


Nice concise article David. It helps organize the steps necessary for overall simple optimization for publishing.
Thank you .
Thanks! Hope I imparted some useful tips to you 🙂
Thanks David! Great info and in ‘plain English’ which I love!!!
Awesome post, learned a lot. Thanks, David! 🙂
Hi David,
Thank you so much for this post. Now I understand much more. It was really helpful and informative to me!
Very complete guide for the Yoast SEO . I am impressed reading this article and will try to practice on my blog. Thanks for useful and meaningful articles for me..
So off SEO plug-ins. It just makes absolutely zero sense to content after uploading it… I converted to Ink for all, this editor with artificial intelligence that helps out with search. I challenge you to show me a plugin or interface with this level of capability.